Friday, November 28, 2014

Broccoli salad

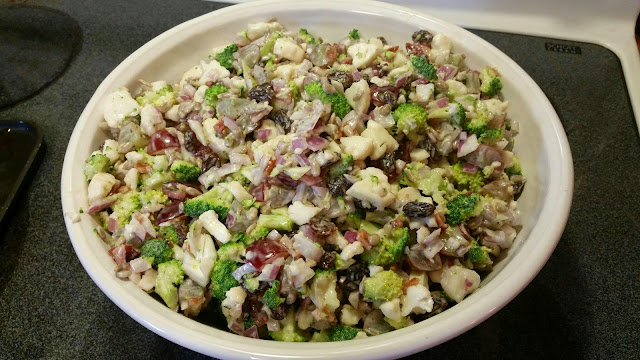
Broccoli Salad

I can't take ANY credit at all for this, this is all over the internet, but ya'll wanted me to post a recipe, so I am.  

Here it is


Ingredients 
Broccoli
Cauliflower
Sunflower Seeds
Raisins
Purple Grapes
Purple Onion
Bacon

Dressing
Mayo
Apple Cider Vinegar
Sugar


So I dont measure anything...I did a full head of cauliflower and 3 bunches of broccoli.  About 6 pieces of bacon, a full onion, a half a gar of raisins, a lot of purple grapes about a good bowl full.  

Cut everything SMALL, like SUPER SUPER SMALL, like when you cut the broccoli and it's all cut up, take your knife and run it over the whole thing again making it even smaller.  Same with the cauliflower.  the grapes I cut in half, then cut in quarters.  the bacon chop up into bits, the onion cut as fine as you can.

The dressing you should be able to pour easy and I just used a whisk to combine the vinegar into the mayo and the sugar.  it should taste tangy and sweet and be slightly runny.  Id say for 2 cups of mayo I used 1/4 cup about there of ACV and about 3 tablespoons of sugar. 

That's it, super simple!  Enjoy!  TOO TOO EASY!  All knife work and no hassle.  YUM!


Monday, November 17, 2014

Gluten free corn bread stuffing

Gluten Free Cornbread Stuffing

So I got the idea of using Gluten Free Waffles from another blog I saw where she used 2 full boxes, I thought to myself, well that might just work.  I knew I needed to make a cornbread stuffing because that's what my husband likes, and it's what he's used to.  If I'm going to change his mind about gluten I better come up with a very similar replacement.  I guess I could use GF bread as well, but why not the waffles, just seemed easy, so that's what I chose to use.

Ingredients:
1 Bag of Bob's Red Mill Gluten Free Corn Bread
(milk, eggs, butter) is what you'll need to make the corn bread
I only used HALF the loaf of cornbread.
1 box of Vans Gluten Free Waffles
(If you want a double batch use 2 boxes of waffles and the entire cornbread)
2 Onion
6 stalks of Celery
2 to 3 cups of Chicken Stock (I suggest homemade, see bone broth recipe)
Salt, Pepper, Sage, Rosemary to taste.


Cook the cornbread according to the packaging.  Make substitutions as needed for food intolerance, it calls for milk, eggs, and butter.  I used all 3 like it calls for.  I wasn't going for dairy free or vegan.  

 I toasted the waffles as well.  I then cut up the waffles into cubes and placed into a large mixing bowl
After the cornbread was done and cooled I did the same with it, cut it into cubes.  (this is where it pays to make your breads early in the day, so you can wait out the cool time on the cornbread)

Take about half a stick of butter and melt it in a pan to saute the onion and celery till it's soft, about 10 minutes or so, don't want to overcook it, just till its soft, then add the bone broth to pan and warm it up, but NOT HOT, just warm, so turn the burner down a bit.  This is when you season the broth, I didn't go light on the salt or sage, I would say at least tablespoons of both as well as pepper, the rosemary I did about a teaspoon.  Taste it as it warms up, it should taste how you want your stuffing to taste.  When it's to your liking pour the mixture over the bowl of stuffing and gently make sure everything is coated and very moist.  Once it's all coated, transfer to a large baking dish and throw into a preheated 450 degree oven for 35 minutes,


After 35 minutes, take it out and fluff with a fork .
 Put  it back in the oven for an additional 10 to 15 minutes.  Depending on how moist you like your stuffing.  

And there ya have it, Gluten Free Thanksgiving Day Cornbread Stuffing!


Sunday, October 5, 2014

Bone broth

Bone broth

So this is so easy that is going to seem ridiculous Im posting a blog post about it.   

I make chicken and beef broth. There are many methods.  This is my method and it's ever changing as well.   

Get a chicken, free range,  pastured, local.  Boil it in a huge stock pot in filtered water for about 3 hours or until it falls off the bone, up to 5 to 7 hours if using a crock pot.    Remove chicken and remove all the meat you can. I used this meat for chicken dishes throughout the week.   Take the carcass and place it back in the pot and add a lot more water.  I use a 10 qt. Stock pot so is a lot of broth.  

 You now add about 2 tablespoons or so of apple cider vinegar. 

Simmer for at least 24 hours, I let it go 36 hours.   After a full day I strain with a fine mesh strainer into a measuring cup and I fill into jars.  Some gets frozen,  some go straight to the fridge for soup that week.  I make bone broth very freqently these days.   Almost weekly when I rotisserie a chicken I use the carcass and all bones for broth as well.  

For beef you go to the butcher and ask for grass fed bones.   Boil with acv for 24 to 36 hours.  Same deal,  strain and store in glass jars. If you freeze them get freezer storage jars. 

While it's cooking feel free to mix it,  to bang the bones on the side to loosen the marrow. 

Broth is gut healing and the best medicine you could drink.  If you get sick,  kids get sick,  hubby gets sick,  make this: bone broth,  3 carrots, 2 stalks of celery,  1 chopped onion, 2 cloves of garlic,  1 tablespoon of salt,  1tsp of parsley,  pepper, rosemary,  thyme and cook separately some gluten free pasta, add to broth some of the chicken and the pasta you have some kick ass homemade chicken gf pasta soup.

The above picture is chicken bone broth in my slow cooker,  while the bone broth was tasty, there was only 4 and a half jars,  so I won't be making it in the show cooker again. The stove top method makes more quanity with same quality.  

People do theirs differently,  there is no right or wrong.  Some add veggies right off the bat,  I prefer to do that later.  I don't even add salt to my bone broth.   I do when I use it to cook.  

Saturday, September 13, 2014

Split pea soup


Split Pea Soup

Ingredients:
3 full big jars of homemade chicken stock
Ham, nitrate free uncured
 3 Carrots
3 stalks of Celery
1/2 large Onion
2lbs of Split Peas
1 Tbsp Salt
1 Tbsp Parsley

ALL PRODUCE IS ALWAYS ORGANIC!


Ok so here it is, cut up all the stuff, the ham into cubes, the carrots, celery, onion.
Pour the Peas into a bowl and make sure they are sorted through throwing away anything questionable.   Take all the ingredients and then add about a good tablespoon of salt into an 8 qt stock pot.  Make sure that you have enough broth to cover all the ingredients but not too much liquid, just covering the veggies and ham.  I added about another jar full of water on top of the 3 jars.  I also added about a good tablespoon of parsley as well.  Now cover it, bring it to a boil and simmer for 45 minutes.  Check to see if the ingredients are cooked, try a pea and see if it's soft.  If not add 10 minutes and check again. 


After it's all cooked up, I put my hand mixer in it and just give it a few pulses maybe 30 seconds worth, just to give it a a blend.  There ya have it!  Easy Easy Split Pea Soup!


ABSOLUTELY DELICIOUS! 


Tuesday, August 5, 2014

Toasted Almond Butter

Toasted Almond Butter

Ingredients: 1 lb bag of organic California ALMONDS

Take Almonds and put them on a cookie sheet and preheat oven to 400 degrees


Place almonds in the oven for 10 minutes, checking after 8.


Remove from oven and allow to cool for 10 minutes or longer if you are patient.  
I like them WARM not hot for the food processor


Place in food processor, and turn it on.


at first you see this, spinning almond meal


see almond crushed up.


then after a few minutes you see it kinda clumping to one side


and then a almond ball and you think, what's going on in there!
It's all good, let it do it's thing.


Finally it smooths out after about 8 minutes and starts to look like almond butter


this is when I do a good scrapping of the top and the sides to get it all in there.


after another minute or so you have ALMOND BUTTER.  Total time in the food processor, anywhere from 8 to 11 minutes.


Toasted Almond Butter!  YUM!  We eat almost daily with an apple, a pear, or a banana.


Friday, August 1, 2014

Roasted garlic hummus

Roasted Garlic Hummus

Ingredients:
1 can Garbanzo Beans or Chick Peas (It's the same thing)
1 heading tablespoon of Tahini
Oil- I use avocado, cause it's super healthy and I like it, and I had it, and well I wanted to.
Roasted Garlic, olive oil for it.


Quickly I will tell you how to roast garlic, get a garlic bulb, cut off the top about 1/3 of the way down so you cut all the tops off each clove.  Take some tin foil and place the garlic on it, pour some olive oil on the garlic so it seeps in the bulb around each clove, wrap that tin foil around it but try not to let the tin foil hit the garlic cloves, so wrap it LOOSELY.  Bake in a preheated over at 450 for 50 minutes.  Let cool for at least 20 before handling it.   Remove the cloves and compost the rest.


take the garlic, drain the beans/peas and add a good whopping tablespoon of tahini.


Blend


Blend some more and scrap the sides and add in the oil by taking the top center thing out and adding it in slowly.  I would say maybe a tablespoon or 2 at most.


Keep blending
Add water if it's too thick for you, taste it, season with salt if you wish, I do not.  You can add anything else you so choose.

Keeps for at least a week, doesn't usually last that long in my house.

We eat it with Gluten Free Chips, Carrots, or use it on sandwiches if you eat bread. Levi Loves Hummus!


Roasted Garlic Hummus

By Vicki Schweiss :)  

Tuesday, May 20, 2014

Brisket

Brisket for Everyone!!!!

Good Day Friends!  Today we make Brisket!  I've been making this for a daytime, anytime, grab and go, easy to warm up for at least the last 6 months there is NEVER no brisket in the fridge.  Need a sandwich Dennis, there's brisket....Heather shows up hungry, there's brisket, Levi wants some MEAT MEAT, I make him some brisket.  It's so simple, anyone can do this.  What do you need:

Ingredients:
3-4-5-6-7 pound Brisket from a good meat supplier. Aim for grass fed, no antibiotic, no growth hormones.
Seasoning
Beef Broth (I make mine, you can purchase if you must, or you can use water)

THAT'S IT!


I seasoned it with Salt, Pepper, Onion and Garlic Powders


Pop it in the over that has been preheated to 350 degrees for 1 full hour...just seasoned, uncovered, just how it's pictured.


This is when I defrost my frozen beef broth. Yeah I freeze it, cause I use a lot, I make a lot, I dont want it in the fridge taking up space.   I defrost it slowly over the hour time the brisket is cooking by warming it slowly in a sauce pan filled with water.


It's defrosted now and the hour is up, pull the roast out and turn your over to 250 degrees.


Add that Beef bone broth in and cover with foil, return it to the oven and set the timer for 7 hours for a 4 to 5 pound and 8 to 9 hours for a 6 to 7 pound brisket. 


Let it cook


After it's done smelling up your house all day, making you have dreams about Brisket, it's time to give her a gander.  Using two forks see if it pulls apart easily.  If it doesn't just fall apart, recover and back in the over it goes, checking every 30 minutes until it falls apart, and I mean easily!  


Ahhhhh sweet success!  Looks delicious!  So now you go to town and get to shredding, I prefer a chunk a chunk method where I pull apart sections and that is about a serving for Levi and I.  Take your chosen pieces and put into the storage container of your liking.  I always use glass with a lid.  These are 7 cup Pyrex glass storage.  One is full the other is about half full.  See that pan below there with all the fat and liquid....this is what makes the re-heating PERFECT.  YOU MUST SAVE THIS! 


Hey look Ready for storage!


Strain out all the yuckies from the bone broth into a cup using a ladle and fine mesh sieve. 


Here is what the uglies look like, strain all the yuck out, leaving you with the goodness of broth.


Pour it into glass jars and save for future use.  When it's time to reheat your brisket, you will use this liquid in a pan on the top of the stove.  Use enough, don't be shy for a full serving I use about 1/4 cup maybe a little more.  This keeps the brisket moist and steams it back to life after being shoved in a bowl in the fridge.
After you refrigerate your broth it will form a thick fat layer on the top, I use a knife the first time and cut an X in it, push one fat piece down into the mixture so the gelatin like liquid comes out, it's thick, it's suppose to be, it's got a lot of great nutrients in it that help your gut lining, so don't be scared of it, IT'S GOOD FOR YOU!  Take the fat and throw it out, leave it in there, mix it in, use it if you want, don't if you don't, not all at once obviously.  It's the best kind of fat for you believe it or not.  I eat it daily and I'm in a healing phase of my disease, which is why I must eat so clean and like this!   So there it is!  Brisket!


This is some brisket on a plate with an egg, my go to breakfast if I'm needed protein right off the bat.  Oh one more thing, FEEL FREE to add some BBQ sauce to it after you've reheated it in your pan with the broth, I add in some homemade or gluten free BBQ sauce cause that's how I like it! Enjoy!


Typical Breakfast before I knew I also couldn't eat eggs.  


Typical Lunch, Brisket with avocado salsa on a gluten free tortilla made from Teff.  
Wednesday, March 26, 2014

Sloppy joes

So Sloppy, So Yummy, So Bad, but it's not out of a can!

Sloppy Joe's on an Udi's Gluten Free Hamburger Bun

Ingredients:
1- 1.5 lbs Ground Beef
1 finely chopped Onion
1 can Tomato Sauce
1/3 cup Ketchup
2 tablespoons Mustard
1 tablespoon Chili Powder
1 teaspoon Sage
 1/4 teaspoon to 1/2 teaspoon Salt
Corn Starch as a thickener if needed I didn't use it.


Here are the ingredients, ohhhhhhh pretty!


Brown the beef over medium heat with the onions


like so, then add all the stuff in


and mix, and you get this!  Cook it till it's the thickness you like on low heat.  I let it simmer down for about 20 minutes and it was stout and tasted great!


Spoon it on a bun, throw some cheese on it if you eat dairy, or onions and pickles, I was out of pickles so I just did onion instead for the extra crunch.  If you are super paleo, then take the meat and wrap it in lettuce instead!  And you have a paleo sloppy joe.  I am eating pretty clean, but I allow a bun once a week for a burger or in this case a sloppy joe.  Grains are a very small part of my main diet.  But allowances are good once in a while as long as it's gluten free.

Enjoy!


Outside cabinet

After much thought and consideration, we decided to build a cabinet instead of buying something in plastic or having to spend over $8,000 on a stone unit with stainless steel doors.  This was much more in our price range.  So Dennis went off and got the wood we needed.  We got a laminate countertop, yeah we know it's not going to hold up well to weather.  We have a few things in place to help with that, and we are hoping that next year we can replace the top with granite.  

Here are some of the beginning shots the outside framing


More of the same. 

A wider look at where it goes in the oasis, yep, I'm calling my back yard the oasis.  It's got a name now!


We stored the top on top but didn't attach it til later, but here is the basic set up, left side is for Entertainment, three shelved spaces and on the right is where the fridge goes.


Another shot

More work on it

And more work

it was cold out when the doors were being built


and handles installed

I thought we were done, but oh wait!!!

He decided to stain and seal, not just seal.


That night after staining it.

the morning after staining

A wide shot so you can see it with everything else.  Now there is a fence over there, I'm still contemplating weather or not I want to stain or paint white.  Not sure now!  Loving the look of the stained wood!

The next evening with the sun at the west. Doing the final install and screwing the top down.

The backyard Oasis is coming together!!!