Monday, December 30, 2013

New years good luck soup.

My New Year's Good Luck Soup!

Ingredients: 
Sausage: I used 5 German Brauts (No Nitrates, fresh, locally made from Red River Fine Meats)
1 purple onion
2 cans of stewed tomatoes
2 can of black eyed peas 
(I wanted the real deal beans but the stores were out oops, my bad for waiting)
Head of cabbage
2-20 ounce jars of home made beef bone broth.  
(You should have this on hand at all time to cook with)
few cloves of garlic
seasoning: Salt, Pepper, Thyme, Rosemary, Tarragon, Parsley


I took the sausage and cut it up into bite sized pieces.  Left the shell on, I chose to NOT get ground sausage and got them in the casing because I wanted them to stay together and be chunks and not like ground into the soup.


I cut up about 3/4 of a purple onion and placed it in with the sausage. 


Cooked sausage and onion on a medium heat until it was browned and onions were done but not burned.


I then added the beans and tomato


I also added 2 full jars of my homemade Beef Bone Broth that takes 36 hours to make.
I think this is why it tasted so damn good!  My bone broth is awesome.  If you need to know how to make that, it's so simple...just ask the butcher for bones when you get your meat, and then boil the bones in water for 36 hours on a low heat...then store in glass with lots of room for expansion and freeze. 

I also cut up an entire head of cabbage and threw that in there as well.  so after all that was in there, I added another 35 or so ounces of water to it to fill er up, so to speak, and since I used my bone broth I knew I could add as much water as I wanted. Then I seasoned the heck out of it,  giving it time and tasting again.  I used rosemary, thyme, tarragon and parsley.  Of course salt and pepper as well.  After it got warm and I was tasting I added more salt.  I use Himalayan Pink Salt that is mined so it's pretty good stuff, but it took some salt, don't be scared, just keep tasting.

after about 20 minutes the cabbage begins to get soft and then you can eat it whenever after that.


Here it is in the bowl!  
It was so delicious
Levi ate it up, I have some video of him, it was hilarious.

Thursday, December 26, 2013

Teriyaki brussels sprouts

Teriyaki Brussels Sprouts

Look at how gorgeous these are.  I found them at the new Natural Grocers.  LOVE IT!  Anyhow I cleaned them up and cut the bottom off and cut them in half. To clean them, simply  rinse under water and then remove the most outer leaf if there is damage from shipment. 


Get a pan and heat up some coconut oil, you're going to sear these babies so they are nice and brown before we steam cook them.


You'll need this.  Really you can use any kind you want, but I have to go Gluten Free...so because you use a little of this, it's not really the "cleanest" way to eat it, but OH MY GOODNESS, just 1 tablespoon for the whole thing is all you really need. Now if you don't want to use teriyaki, there are so many other things you CAN use...Balsamic Vinegar, Worcestershire sauce are two that sound like they would be good.  


So brown the heck out of them and this is when I season them too, I use a little curry, or some garam masala, in addition to just plain ol salt and pepper.  Hold off on the teriyaki until you add the water to steam them.  If I had to guess Id say it takes about 4-6 minutes to sear them up on medium heat...not too hot


After a few minutes add a little bit of water, just about enough to cover the bottom of the pan.  This is also when you add the teriyaki sauce to it, I just add it right to the water in the center. The water is going to be absorbed into the brussel sprouts and so will all that great teriyaki sauce you put in there, not too much, just enough, about 1 1/2 Tablespoons or so.


Like so....then COVER IT FOR ABOUT 6 MINUTES or so. and turn the heat down to simmer it and steam them.


When all the water has been absorved, it's done.  If the color is still really bright green, go another minute, and add a very small amount of water to prevent burning. You want it to be soft not too crispy.


And the finished product is this!


Served with Filet Mignon and Mashed Potatoes

Sunday, December 8, 2013

Thai butternut squash soup

Thai Butternut Squash Soup

Ingredients: 
1 Butternut Squash
Coconut Oil
1 Sweet Onion
4-5-6 Cloves of Garlic
Ginger (Full finger size piece)
Veggie or Chicken Stock
Garam Masala
Curry Powder
Salt and Pepper
1/2 can of Coconut Milk full fat, refrigerated to separate the cream out.
1 Lime
Cilantro for Garnish

I cut the top and bottom off the butternut squash and then peel the skin off with a veggie peeler, it's a lot of work to do it this way, but it  is what it is.  Takes about 10-15 minutes, probably the hardest part of the whole thing, making the end result that much sweeter.  When it's peeled, cut it down the middle lengthwise and scrape the guts out like a pumpkin with a spoon.  Then lay on the side and cut into stripes and then into chunks.


Cut up the onion, the ginger and the garlic, my garlic was still whole here, but I wanted to shoot the picture before dumping it all in the pan, I needed more room for chopping the garlic.


All chopped up and ready to saute with coconut oil.  Do so until it's fully transparent, but not browned.


Like so below!
Now add your garam masala, curry, salt and pepper, and dont be stingy with it.  Like a tablespoon of curry and 1/2 tbs of garam masala and teaspoon of salt and 1/2 of that in pepper or so, you know a good amount.  I went less here and then ended up adding more throughout the cooking process....ohh I also wanted a little bite, so I added a smige of cayenne pepper too, but I didn't include that in the ingredients above...you gotta read the recipe to know the secret bite to the soup. 


Add the cubed butternut squash and then add some veggie or chicken stock, which ever you have on hand.  I used chicken since that's what I had.  I also only used 8 ounces and then added some water as well.


Now you cook it, takes about 40 minutes on a nice simmer/low boil.   When you are done cooking it, then you have some options as to how to make it into your soup...What I did was took some water out, stuck my hand blender/emulsifier into the stock pot and blended. After it's blended Add in your coconut cream from the top of the refrigerated can of coconut milk and the juice of a fresh lime and simmer for 10-20 additional minutes.  If it's not the right consistency, add back your water you took out, before and after the coconut milk, which I did, I like a thinner soup, not a thick bisque, but again it's your soup, so make it how thick/thin you want it to be.  A lot of people LOVE it really quiet thick, so then when you take some water out, leave it out and adding the coconut cream is enough to thin it back down.  It's great like that as well.   Other options for making into a soup are a food processor and a blender. 


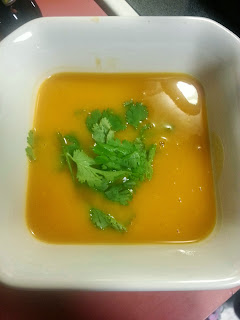
Here is the final product.  I like cilantro as a garnish, you can chop it up or eat it whole.  People also like to garnish with chopped up peanuts, but I dont have any.


Hope you enjoy making your Thai Butternut Squash Soup! This recipe is Gluten and Dairy free and if you use veggie stock it's Vegan as well.  And it's Paleo!

Monday, December 2, 2013

Crock pot santa fe chicken and rice

Crock Pot Santa Fe Chicken (My Way)

Ok so this one is so easy and makes a great MONDAY dish, cause after a nice weekend, who wants to spend the whole day in the kitchen.  I like crock pot dishes for Monday's! You'll need some chicken.  I eat as clean as possible so I choose Rosie's organic, or smart chicken that's organic.  Both are great, if you have a clean source for free range and no growth hormone chicken go with it, if not, then please consider buying organic.  You will also need Corn, I choose frozen over canned any day.  Chicken Broth.  Canned or you can cut up fresh diced tomato, black beans, green chilies, an onion, some spices, garlic and cayenne pepper, scallions or green onions and cilantro.  I choose to garnish with some sour cream as well. 


Throw the tomato, green chilies, corn, drained black beans, chicken broth and spices into the crock pot

Put the frozen chicken on top and that diced onion, I used red onion, but it really doesn't matter what kind you use.

after about 4 hours it was ready for shredding, I took the chicken out and shredded it with two forks and just put it back in for another hour or until your ready for dinner

Cut up some green onion, some cilantro, and make some rice.  Throw the chicken on top of that rice garnish with all the good greens and top with sour cream.  I guess if you want add some cheddar cheese too, or black olives would be good too.  I didn't. 

Here is the boy enjoying his meal!  Levi loves Crock Pot Santa Fe Chicken and rice!