Thursday, September 10, 2015

Vanilla coconut milk creamer

Vanilla Coconut Milk Creamer

Ingredients:
1 can full fat coconut milk (Organic when possible)
1 TBSP of Vanilla 
2 TBSP of Coconut Nectar
1 TBSP of coconut sugar
1/2 TBSP to 1 TBSP of coconut oil.


Put all ingredients in the blender and blend until fully mixed


Store in a mason jar of your choice and refrigerate.  Use within 5 to 7 days.

A great dairy free option for the coffee creamer lover who doesn't want to give up coffee.


Wednesday, August 19, 2015

Butternut Squash Soup

Thai Butternut Squash Soup 2015 version.

Ingredients: 
Butternut Squash
Onion
Celery
Garlic
Coconut Milk
Seasoning:
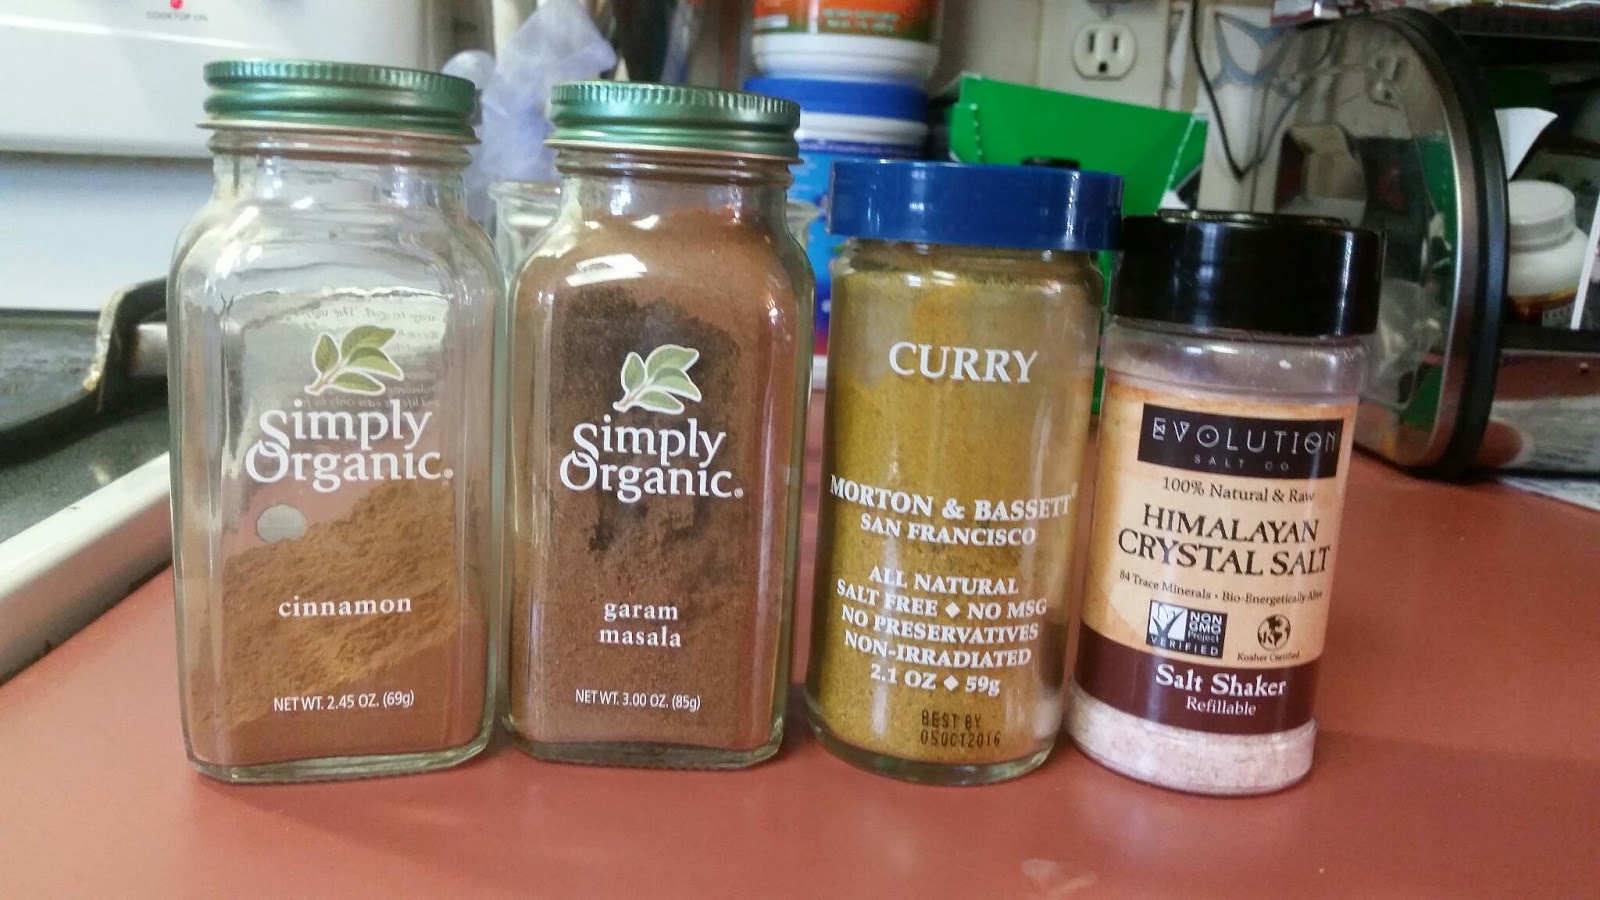
Curry
Garam Masala
Cinnamon
Turmeric
Ginger
Salt
Cumin


Turn oven to 400 degrees.  Cut squash lengthwise and cut top off to make that easier and a place for you to balance the squash so you can cut it.  


Using a spoon scrape the seeds out


Place face down in a baking dish of your choice and fill about 3/4 of an inch with water.
Bake at 400 for at least 45 minutes of so.  Now this is only 1 method.  You can peel the whole thing too and then cube it and I have a recipe on this blog from back in 2013 that I did just that.  With cooking anything goes!  


While the squash is cooking cut up your celery, onion and garlic.


You can also add in some fresh ginger if you have it around or it's an important taste you want or if you want the anti inflammatory properties of both ginger and turmeric, both can be added at this time with the ginger, onion and celery. 


I used grass fed butter to saute 


then once it was softened, I added in a small amount of broth and got it simmering.


time for some spices, I was not very generous here, just a sprinkle of everything.


mix it in.  Let that sit on the stove, add more broth if you need to, you want the veggies SOFT, they are going to be blended, so you want them cooked. 


Oh look the Squash is almost done, this was actually underdone at this point.


I knew I was going to simmer it longer so I took it out after 45 minutes, if you want to cook it longer feel free to cook it till it bubbles brown on the skin.


Use a huge tuner and get them our of the water carefully, and flip them onto either a cookie sheet or a cutting board and let it cool for about 5 minutes


Scrap the meat from the skin and put it in the pot with the onion, garlic and celery (Ginger, Turmeric).


add more seasoning now and enough broth but not too much. You don't want your soup too runny, and you are going to add in some coconut milk still too, so keep the liquid just where the veggies are somewhat sticking out like this.


mix and let it simmer for a few minutes depending on how done your squash was.  Mine needed about 20 minutes simmer time, and this helps incorporate all the ingredients. 


This was after that 20 minutes or so of simmering covered and me mixing it up every few minutes.


Get out your hand blender.  If you dont have one, you can transfer to a blender, but if your blender is plastic, beware, the soup might be too hot for your machine.  You might need to wait for it to fully cool. 


This is when I add the coconut milk to get the exact consistency I wanted.  I used 3/4 of a can.  

I jar up the soup and store in the fridge after it's cooled. 


Each full jar is 2 large bowls of soup. 

To Garnish chop up some cilantro or you can add a spoonful or sour cream, or yogurt on top too. 

Friday, May 29, 2015

India Inspired Zucchini

India Inspired Zucchini 

Ingredients:
Zucchini
Butter
Garam Masala
Salt
Curry
Cinnamon


In a pan melt a good amount of butter, maybe 2 tablespoons or so.


Dice up the Zucchini 


Here are the spices I used...and I don't mess around, I use a lot of spice.


Spice it up!  Check out how much I use.  It's almost covered.  More GARAM MASALA then anything, then a small amount of cinnamon, a sprinkle and a sprinkle of curry too.  Some salt to taste.  

Let it cook, COVERED tossing in the melted butter every 3 minutes or so.  I cooked it about 20 minutes total.


In the process of cooking


Ok it's done!  And lookie there, beautiful.  Use a low to medium heat and cook it till it's tender.  


Finished product on a plate with some homemade purple and red potato salad with a creamy fresh dill dressing and rotisserie chicken breast I cut off my whole chicken.   

#eatcleanlivehealthy

Friday, November 28, 2014

Broccoli salad

Broccoli Salad

I can't take ANY credit at all for this, this is all over the internet, but ya'll wanted me to post a recipe, so I am.  

Here it is


Ingredients 
Broccoli
Cauliflower
Sunflower Seeds
Raisins
Purple Grapes
Purple Onion
Bacon

Dressing
Mayo
Apple Cider Vinegar
Sugar


So I dont measure anything...I did a full head of cauliflower and 3 bunches of broccoli.  About 6 pieces of bacon, a full onion, a half a gar of raisins, a lot of purple grapes about a good bowl full.  

Cut everything SMALL, like SUPER SUPER SMALL, like when you cut the broccoli and it's all cut up, take your knife and run it over the whole thing again making it even smaller.  Same with the cauliflower.  the grapes I cut in half, then cut in quarters.  the bacon chop up into bits, the onion cut as fine as you can.

The dressing you should be able to pour easy and I just used a whisk to combine the vinegar into the mayo and the sugar.  it should taste tangy and sweet and be slightly runny.  Id say for 2 cups of mayo I used 1/4 cup about there of ACV and about 3 tablespoons of sugar. 

That's it, super simple!  Enjoy!  TOO TOO EASY!  All knife work and no hassle.  YUM!


Monday, November 17, 2014

Gluten free corn bread stuffing

Gluten Free Cornbread Stuffing

So I got the idea of using Gluten Free Waffles from another blog I saw where she used 2 full boxes, I thought to myself, well that might just work.  I knew I needed to make a cornbread stuffing because that's what my husband likes, and it's what he's used to.  If I'm going to change his mind about gluten I better come up with a very similar replacement.  I guess I could use GF bread as well, but why not the waffles, just seemed easy, so that's what I chose to use.

Ingredients:
1 Bag of Bob's Red Mill Gluten Free Corn Bread
(milk, eggs, butter) is what you'll need to make the corn bread
I only used HALF the loaf of cornbread.
1 box of Vans Gluten Free Waffles
(If you want a double batch use 2 boxes of waffles and the entire cornbread)
2 Onion
6 stalks of Celery
2 to 3 cups of Chicken Stock (I suggest homemade, see bone broth recipe)
Salt, Pepper, Sage, Rosemary to taste.


Cook the cornbread according to the packaging.  Make substitutions as needed for food intolerance, it calls for milk, eggs, and butter.  I used all 3 like it calls for.  I wasn't going for dairy free or vegan.  

 I toasted the waffles as well.  I then cut up the waffles into cubes and placed into a large mixing bowl
After the cornbread was done and cooled I did the same with it, cut it into cubes.  (this is where it pays to make your breads early in the day, so you can wait out the cool time on the cornbread)

Take about half a stick of butter and melt it in a pan to saute the onion and celery till it's soft, about 10 minutes or so, don't want to overcook it, just till its soft, then add the bone broth to pan and warm it up, but NOT HOT, just warm, so turn the burner down a bit.  This is when you season the broth, I didn't go light on the salt or sage, I would say at least tablespoons of both as well as pepper, the rosemary I did about a teaspoon.  Taste it as it warms up, it should taste how you want your stuffing to taste.  When it's to your liking pour the mixture over the bowl of stuffing and gently make sure everything is coated and very moist.  Once it's all coated, transfer to a large baking dish and throw into a preheated 450 degree oven for 35 minutes,


After 35 minutes, take it out and fluff with a fork .
 Put  it back in the oven for an additional 10 to 15 minutes.  Depending on how moist you like your stuffing.  

And there ya have it, Gluten Free Thanksgiving Day Cornbread Stuffing!


Sunday, October 5, 2014

Bone broth

Bone broth

So this is so easy that is going to seem ridiculous Im posting a blog post about it.   

I make chicken and beef broth. There are many methods.  This is my method and it's ever changing as well.   

Get a chicken, free range,  pastured, local.  Boil it in a huge stock pot in filtered water for about 3 hours or until it falls off the bone, up to 5 to 7 hours if using a crock pot.    Remove chicken and remove all the meat you can. I used this meat for chicken dishes throughout the week.   Take the carcass and place it back in the pot and add a lot more water.  I use a 10 qt. Stock pot so is a lot of broth.  

 You now add about 2 tablespoons or so of apple cider vinegar. 

Simmer for at least 24 hours, I let it go 36 hours.   After a full day I strain with a fine mesh strainer into a measuring cup and I fill into jars.  Some gets frozen,  some go straight to the fridge for soup that week.  I make bone broth very freqently these days.   Almost weekly when I rotisserie a chicken I use the carcass and all bones for broth as well.  

For beef you go to the butcher and ask for grass fed bones.   Boil with acv for 24 to 36 hours.  Same deal,  strain and store in glass jars. If you freeze them get freezer storage jars. 

While it's cooking feel free to mix it,  to bang the bones on the side to loosen the marrow. 

Broth is gut healing and the best medicine you could drink.  If you get sick,  kids get sick,  hubby gets sick,  make this: bone broth,  3 carrots, 2 stalks of celery,  1 chopped onion, 2 cloves of garlic,  1 tablespoon of salt,  1tsp of parsley,  pepper, rosemary,  thyme and cook separately some gluten free pasta, add to broth some of the chicken and the pasta you have some kick ass homemade chicken gf pasta soup.

The above picture is chicken bone broth in my slow cooker,  while the bone broth was tasty, there was only 4 and a half jars,  so I won't be making it in the show cooker again. The stove top method makes more quanity with same quality.  

People do theirs differently,  there is no right or wrong.  Some add veggies right off the bat,  I prefer to do that later.  I don't even add salt to my bone broth.   I do when I use it to cook.  

Saturday, September 13, 2014

Split pea soup


Split Pea Soup

Ingredients:
3 full big jars of homemade chicken stock
Ham, nitrate free uncured
 3 Carrots
3 stalks of Celery
1/2 large Onion
2lbs of Split Peas
1 Tbsp Salt
1 Tbsp Parsley

ALL PRODUCE IS ALWAYS ORGANIC!


Ok so here it is, cut up all the stuff, the ham into cubes, the carrots, celery, onion.
Pour the Peas into a bowl and make sure they are sorted through throwing away anything questionable.   Take all the ingredients and then add about a good tablespoon of salt into an 8 qt stock pot.  Make sure that you have enough broth to cover all the ingredients but not too much liquid, just covering the veggies and ham.  I added about another jar full of water on top of the 3 jars.  I also added about a good tablespoon of parsley as well.  Now cover it, bring it to a boil and simmer for 45 minutes.  Check to see if the ingredients are cooked, try a pea and see if it's soft.  If not add 10 minutes and check again. 


After it's all cooked up, I put my hand mixer in it and just give it a few pulses maybe 30 seconds worth, just to give it a a blend.  There ya have it!  Easy Easy Split Pea Soup!


ABSOLUTELY DELICIOUS!